Create your content. Plan your week. Know what happens next.
Find help with creating, scheduling and managing content in DigLab Social. Choose a topic from the menu or search the articles by title, feature or question.
Start using Social
Before you beginCheck your workspace, connected accounts and publishing access.
Features depend on your plan, role, connected channel, permissions and available credits. Menu names and options may differ between workspaces.
The screenshots show the interface checked on 19 September 2026 and are cropped for privacy. The DigLab guide mascot highlights useful controls in the screen tours.
Start with one connected channel and one approved update. Complete the before-you-begin checks first.
Choose your accounts
Open New Post from the workspace. In Accounts, select the exact destinations for this post. Check the profile, not just the network icon.
Write & attach
Add your caption. Choose Upload media or Add from library. If you use an AI caption or image, review it before continuing.
Preview each channel
Check the destination preview, media crop, text, links and mentions. Adapt the post to each channel’s format and limits.
Follow your review flow
If your workspace requires approval, use its review workflow before publishing. A draft or pending approval is not a scheduled post.
Set the time
Choose Select date and time. Confirm the date, time zone and destinations, then select Schedule Content when the post is ready.
Check the result
Find the post on the calendar or in your content list. Verify its status. After publication, check the actual post on the destination network.
You’re done when: the right post appears for the right accounts at the intended time, with a scheduled status or a clearly identified approval step.
Use the post composer
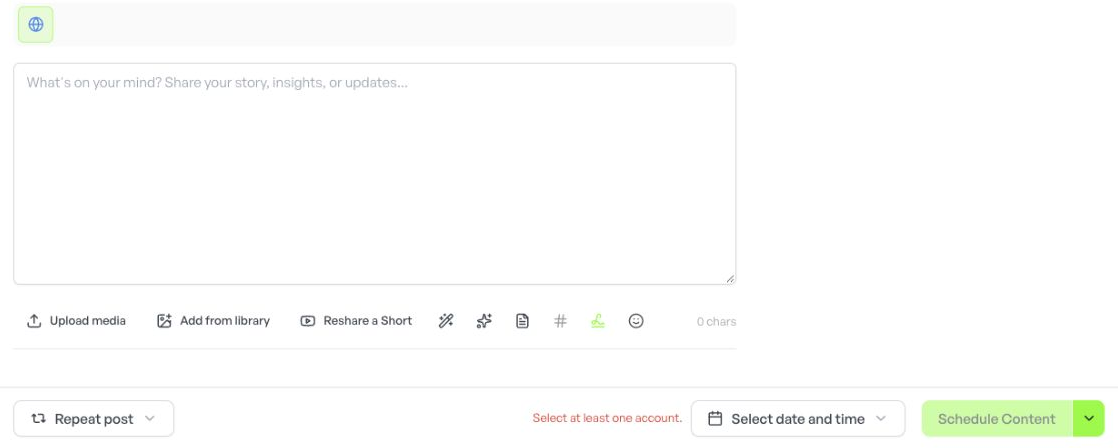
Choose your accounts above the caption area, then build the post here.
Caption: write the message in the large text box.
Media: upload a file or reuse an approved library asset.
Schedule: choose the date and time at the bottom, then confirm.
Guide tip: if Schedule Content is disabled, check the account selection and required content first.
Screen reference
Start with your caption
Composer detail. The account row is outside this crop. No accounts are selected, so scheduling is disabled.
Use the calendar
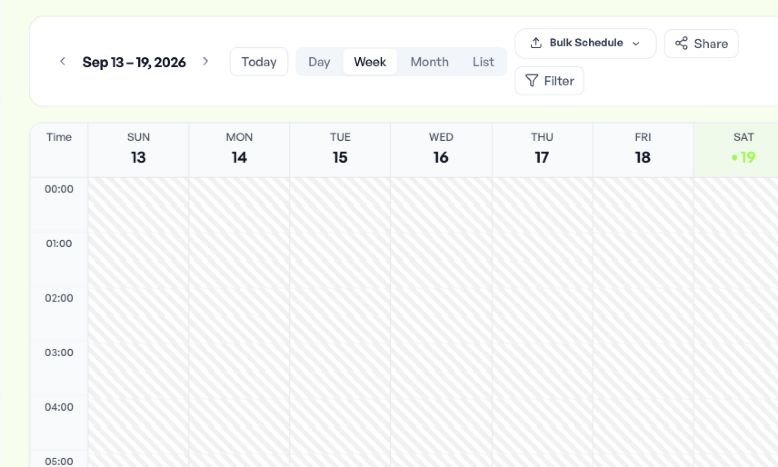
Use Day, Week, Month or List to choose your view. Use the arrows or Today to move through dates.
Filter: narrow the view to the content you need.
Open a post: review its destinations, timing and current status before making changes.
Bulk Schedule: use the available bulk tools only after reviewing the individual posts.
Guide tip: sharing a calendar can expose its contents. Check the audience and access before using Share.
Screen reference
Choose your calendar view
Toolbar and upper grid only. Posts outside this cropped time range are not shown.
Create an image
Open the image creation tool available in Create or use the composer’s image-generation control.
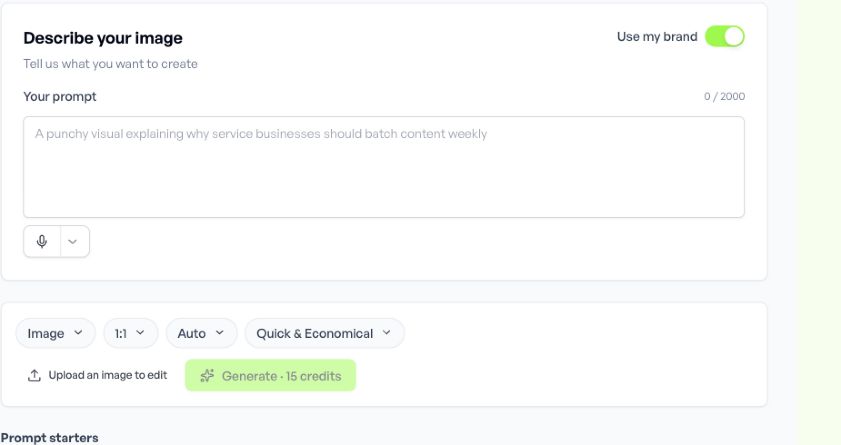
Describe your image: include the subject, purpose, composition and any exact text.
Use my brand: apply your workspace’s brand context when appropriate.
Choose settings: review aspect ratio, style, quality and the displayed credit cost before generating.
Guide tip: generated work is a draft. Check spelling, claims, brand details and rights before using it in a post.
Screen reference
Write a specific visual brief
The screenshot shows one configuration. Credit costs and available settings can change.
Organise ideas and drafts
Find it in: Content / planning
How it works
Use the content library to find drafts, scheduled posts, published content and failures. Where available, capture early ideas on the idea board and turn them into drafts.
Things to check
Good habit: check the status before editing or scheduling the same content again.
Write and repurpose content
Find it in: Create / writing
How it works
Use caption assistance, prompt templates and repurposing tools to create a starting point from approved source material. Tailor the message to each destination.
Things to check
Good habit: verify facts, links and calls to action. AI suggestions still need your review.
Set your brand context
Find it in: Workspace / brand settings
How it works
Maintain your brand profile, voice, audience, guidelines and approved reference documents where these settings are available. Brand memory helps keep future drafts consistent.
Things to check
Good habit: keep sensitive customer records and credentials out of marketing prompts and documents.
Use the media library
Find it in: Create / media
How it works
Attach images and videos from the media library. Use available image editing, resizing, carousel or video tools to prepare the format your channel needs.
Things to check
Good habit: preview the final crop and confirm you have permission to use every asset.
Review and approve content
Find it in: Approvals / collaboration
How it works
Use your team’s approval process to assign a reviewer, collect feedback and reach an explicit decision before content goes live.
Things to check
Good habit: confirm the latest version is approved, especially after changes to an offer, claim or date.
Understand your analytics
Find it in: Analytics / performance
How it works
Select the account and reporting period, then compare the metrics your channel provides. Review individual posts to understand which topics and formats help.
Things to check
Good habit: give new data time to arrive. Missing metrics are not necessarily zero, and engagement alone does not prove sales.
Use automation and bulk tools
Find it in: Automation / repeatable work
How it works
Where enabled, use approved source feeds, queues, recurring content or bulk tools to reduce repetitive work. Review destinations, timing, repetition and approval rules.
Things to check
Good habit: test with a small, reviewed batch and check its outcome before increasing volume.
Use Social’s Inbox
Find it in: Inbox / conversations
How it works
Social’s Inbox brings supported comments, mentions or messages into the workspace. Coverage depends on the network and its connection permissions; publishing support does not guarantee messaging support.
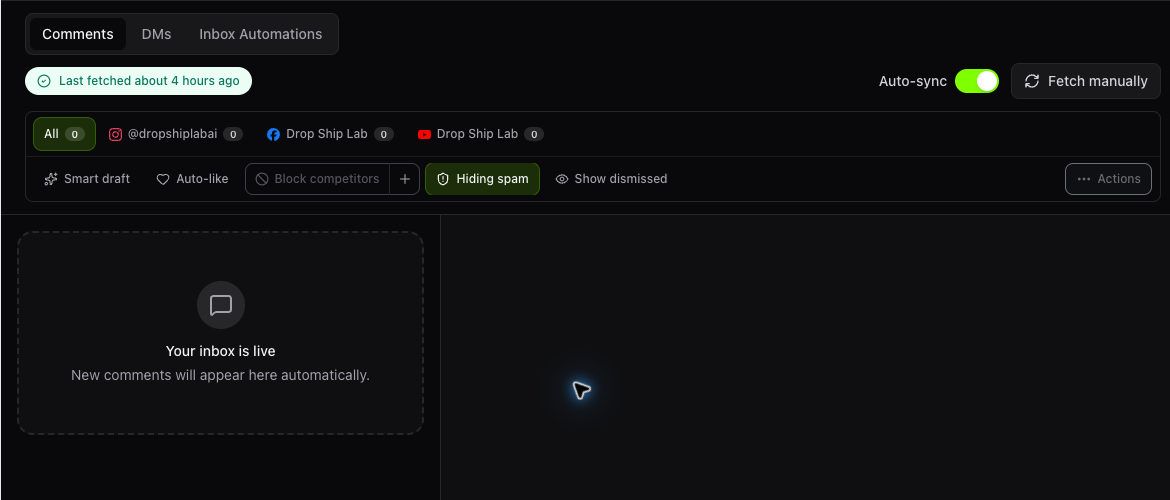
Social Inbox in the Drop Ship Lab workspace. This captured view has no comments. Available channels depend on your connections and permissions.
For the separate customer messaging platform, use DigLab Inbox docs.
Manage account connections
Find it in: Integrations / connections
How it works
Use the available integration and connection settings to check account access. Reconnect through the official sign-in flow when prompted, using the correct account owner.
Things to check
Good habit: after reconnecting, review affected posts before retrying so you do not publish duplicates.
Supported publishing channels
Find it in: Channels / availability
How it works
Documented publishing destinations include Facebook, Instagram, YouTube, X, LinkedIn, TikTok, Bluesky, Threads, Pinterest, Google Business and Mastodon.
Things to check
Good habit: confirm your account type, format and current connection support. WhatsApp is not a Social publishing destination.
Watch the workflow overview
Existing DigLab fair film · 60 seconds · silent · English and Chinese on-screen text.
Direction. Plan. Learn.
A conceptual overview of the content workflow, illustrated through the Drop Ship Lab business. This is not a click-by-click Social product tutorial.
Set the direction: agree on the objective, brand boundaries and approval path.
Build the plan: connect ideas, production and review.
Learn from the cycle: reuse verified work, evaluate results and refine the next plan.
The written steps and screen tours above explain the current Social controls.
Cannot select an account or schedule
I cannot select an account or schedule a post.
What to check
Confirm the workspace, account connection and your publishing role. Select at least one account and complete the required caption or media. Check for channel validation messages and any approval requirement. If access is missing, contact your workspace administrator.
Read the failure message first. Check the connection, account permissions, media format and network limits. Open the destination account to confirm the post was not already published. Correct the cause, then retry only the affected item. Repeating the submission without checking can create duplicates.
Check the selected date range and calendar filters, then inspect the post’s date, time zone and destinations. Compare these with your workspace and account settings. Confirm the corrected scheduled time before leaving the post.
Availability varies by plan, role, channel and connection. Some networks expose fewer metrics or conversation types, and new data may take time to sync. Confirm the account and date range. Ask your workspace administrator about enabled features before assuming an option is broken.
Check the destination’s supported file type, size, aspect ratio and duration. Re-export an appropriate version, attach it again and inspect the preview. A file that works on one channel may need a different version for another.
Review the workspace’s brand context and give the prompt a specific audience, goal, tone and example. Replace unsupported claims and check exact text in images. Keep the final decision with a human reviewer.